Showing posts with label Holidays. Show all posts

Wednesday, January 25, 2012

Roasted Butternut Squash Soup

Another one of my should-have-posted-a-month-ago-but-all-of-a-sudden-I-got-too- busy-and-forgot-about-it recipes. This one is Roasted Butternut Squash Soup! Probably the easiest of all soup recipes but because it has only 2-3 ingredients and tastes absolutely divine on a cold winter day.

Ingredients:

1 Butternut Squash, halved, seeds scooped out

Some olive oil

½ Onion, chopped

3 Cups of Vegetable broth

1 Tsp of Nutmeg

Salt and Pepper to taste

(Seriously, that’s all the ingredients)

1. To roast the squash, drizzle olive oil on the squash (on everything that isn’t the skin), place skin side up on parchment paper on a cookie sheet. Bake for 1 hour in a 350-degree oven. When pierced with a fork, the squash should already feel very soft.

2. Brown the onions in a large pot with some olive oil. Scoop the roasted squash out of the skin and into the pot.

3. Add the broth and spices. Bring to a boil, let simmer for 30 minutes.

4. Blend the soup in a blender, or use an immersion blender.

5. Serve immediately. I topped mine with some sour cream snowflakes but that’s only because it was the holidays! A dollop would probably work as well…

Bon Appétit!

Almond Danish Pastry: Attempt #1

There is this Danish pastry that my family eats typically every Christmas for brunch that is better than any other pastry, dish, or meal I’ve ever had. It’s called wienerbrød and you can typically just buy the “real” stuff in Danish bakeries or Christmas markets. Growing up in Ottawa, we got ours in Kingston (which is about an 90 minutes away) frozen and would bake it for any special occasion. When we moved to Vancouver, we were able to find a Danish bakery in Coquitlam. Their pastries were delicious but incredibly overpriced so it came as no surprise when they went out of business a few years ago. So here we are, I’ve been craving this pastry for what seems like forever. It’s buttery, flaky, almondy and pretty much the most incredibly delicious, decadent and rich pastry I’ve ever had the pleasure of eating. After weeks of searching for recipes at the library (yes, I did that) and online, I came up with my own and served it for Christmas breakfast. I wouldn’t go as far as calling it wienerbrød (let’s just call it Danish Breakfast Pastry) as it wasn’t entirely what I was trying to bake, but it did come out as a flaky, sweet and tasty breakfast for my family. I will keep trying and trying until I get this recipe down, but for now, this one will have to do.

Ingredients:

1 Box of Buttery Puff Pastry (yes, I use the frozen kind. I find that when trying new things, you limit the risk of messing up your homemade puff pastry when you are using this foolproof alternative. It’s good too!)

1 Cup of Water

½ Cup of Butter

1 Cup of Flour

3 Eggs

1 Tsp of Almond Extract

For the Glaze:

1 ½ Cups of Confectioners’ Sugar

2 Tbsp of Butter

1 Tsp of Almond Extract

1 Tbsp of warm water (more if needed)

1/3 Cup of Toasted Slivered Almonds

1. Roll out the puff pastry into two long rectangles

2. In a saucepan, bring the water and butter to a boil. Add the flour and stir until a smooth ball is formed, remove from heat.

3. Add in the almond extract and the eggs (one at a time) until the dough is well combined.

4. Spread the mixture evenly over the two rectangles of puff pastry. Fold rectangle into 3 so that you are left with a rectangle that is a lot more narrow and so that the mixture is entirely covered in puff pastry.

5. Bake for 1 hour in a 350-degree oven.

6. To make the icing, mix the ingredients together. Make sure the water is warm enough so that the icing can be spread easily.

7. Spread icing evenly onto the two cooled pastries and top with toasted slivered almonds.


Note: I made these the night before, while waiting for Santa to stop by. Before serving them in the morning, I popped them in the oven for 15 minutes as this is a pastry best served warm. Enjoy!

Bon Appétit!


Monday, January 16, 2012

Candy Cane Macarons

This is my 4th attempt at making macarons, but the 1st of what I would call “successful”. I’ve tried different cookbook recipes, different flavours, but this is the first one I am more than thrilled to share with you. I won’t bother writing the recipe down as I’m pretty sure that’s what we call “plagiarism.” I’m only sharing my pictures and sending you on your way to the only recipe I trust! Annie’s Eats is, hands down, my favourite food blog. I read it almost daily and want to try pretty much every recipe she posts, not to mention her food photography is to die for!

Please make these for yourself, and definitely consider trying the various flavours she’s posted on. Enjoy!

Candy Cane Macarons can be found on this webpage of Annie’s Eats.

My only advice for these finicky cookies would be that you not make them on a rainy day. Your environment needs to be dry, and you need to be patient and not overwork ANYTHING. Good Luck!

Bon Appetit!

Chocolate Sugar Cookie Santa Mittens

I’m finally getting back on track with posting recipes after a busy holiday season. I probably should have posted these ones WAY before Christmas but I completely lost track of time. As always, I make up reasons to bake my days away and made these specifically for my brother’s grade 4 class as a treat to bring in for their Christmas party. The recipe is very simple, as is the design. The hardest part about any of these sugar cookies is really the amount of patience you have to let them dry properly between steps. It’s really come to my attention recently that patience is probably the only skill in life you need to get anywhere, or create absolutely anything. This is good practice. Enjoy!

Chocolate Sugar Cookies:

Ingredients:

¾ cup of all-purpose flour

1/3 cup of cocoa powder

6 Tbsp of butter, unsalted and at room temperature

¾ cup of confectioners’ sugar

1 egg

½ tsp vanilla extract

Pinch of salt

In a bowl, combine the flour, salt, cocoa powder. In a larger bowl, or the stand mixer (my one true love!) beat the sugar and butter together until light and fluffy (a few minutes). Stir in the egg and vanilla on low speed until combined. Slowly add in the flour mixture until dough forms. Wrap it in plastic in the disk shapes, and refrigerate for 1-2 hours. Once the dough has chilled, roll it out on a floured surface OR between two layers of plastic wrap (this method is ingenious and practically mess proof!) Cut into desired shapes only once the dough has been rolled out to ¼” in thickness. Bake in a 325-degree oven for 10 minutes. Let cool on the rack for 10 minutes before transferring them to a wire rack.


For the Icing:

4 cups of confectioners’ sugar
2 tbsp. meringue powder (this stuff is expensive, and I use it way too often!)
6 tbsp. water
Gel food coloring

1. Combine all the ingredients in a stand mixer (or mix by hand) on medium speed, until the icing has a smooth and matte consistency, about 10 minutes.
2. Separate Icing into separate bowls for dying. Use gel food coloring to not alter the texture.
3. Once all the colors are created, divide the colors into two batches, one thick batch for the contour lines, and one thinner watered down batch for the filling. Place the contour icings into bags and pipe the outline onto cookies. Fill the cookies with the runnier icing until smooth. Let them dry 1-2 hours, or overnight.
4. Pipe detail onto cookies and let set 1-2 hours.
5. They are ready to eat or wrap into cute little cellophane gift bags!


Bon Appetit!

Friday, December 16, 2011

Chocolate Covered Caramel Pretzels

If I make a deal with myself not to spend anytime on my computer while at home, you can pretty much guarantee I will be bored out of my mind, and whipping up several baked dishes at once and starting way too many projects in the kitchen. I don’t think I spent more than 10 minutes making these and I’m very pleased with the end results! If I were trying to create holiday treat baskets, I would definitely add these ones in it.

Ingredients:

30 Pretzels (or more until you run out of caramel and chocolate to coat them in)

A bag of Kraft Caramels, (around 35 if buying bulk)

6 Oz of Milk Chocolate chunks

Place the unwrapped caramels in a glass bowl. Microwave on high heat in 30-45 second increments until the caramels are completely melted. Place parchment paper on the counter. Stir the pretzels directly into the melted caramel. Quickly coat them all and poor the mixture onto the parchment paper. Using a fork, separate the pretzels so you don’t end up with a ball of hard caramel once it cools. Melt the chocolate chunks in a heatproof bowl over simmering water while the pretzels are cooling. One at a time, dunk the cooled pretzels into the chocolate and set to dry on a clean parchment paper sheet. Decorate with sprinkles and let cool completely before storing in an airtight container.

Bon Appétit!

Monday, December 5, 2011

My 2011 Gingerbread House

Here are a few pictures of the Gingerbread House I made this year. Everything but the snowmen's scarves and arms is edible! I got the pre-cut gingerbread cookie house at IKEA, and the royal icing recipe I used to build and decorate can be found here. Enjoy!


Tuesday, November 29, 2011

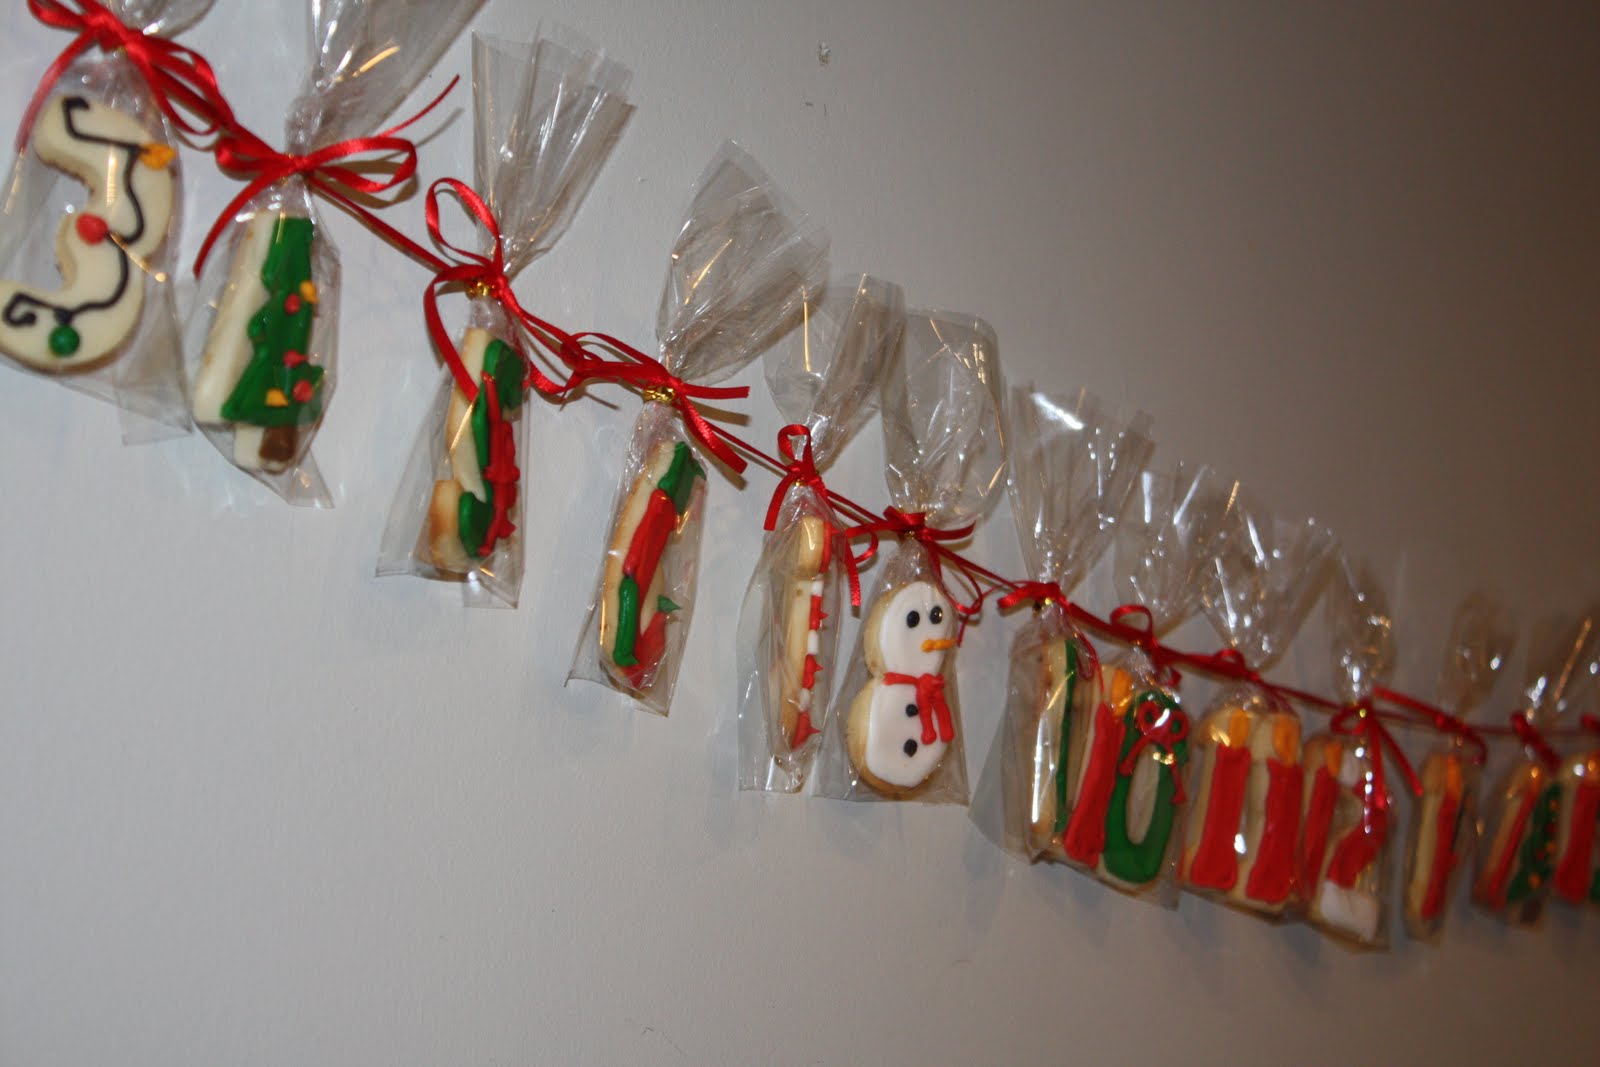
Sugar Cookies - Christmas Advent Calendar Edition


I've been keeping busy this past week... I got this crazy Idea a few weeks ago to make advent calendars out of sugar cookies. We have numbered cookie cutters so I thought it would be very simple and easy. Boy, was I wrong! After calculating that I would have to make 5 different colours of icing (probably more, I've lost track) as well as dirty all the cookie cutters. I deciding only making myself an advent calendar wasn't worth it so I attempted to make 12!

For those of you who can't do the math... That's 41 cookies. Per calendar. times 12. FOUR HUNDRED AND NINETY TWO COOKIES.


and eventually, with a little help from my sister just when I was about to lose it completely... we managed to finish


A few met untimely deaths when a pack of chocolates fell on them... and in the end.. I was left with 10 whole advent calendars, and two almost whole calendars that my brother will surely devour.


My favorites were by far the little snowmen "8"!


Here is the first completed calendar, also our first christmas decoration of the year!


Monday, April 25, 2011

Sugar Cookies - Easter Edition

Every holiday, I find myself making sugar cookies to spread some holiday cheer. They are great hostess gifts and are also very cute! The recipe is always the same but the results are endless. The only downside to making these is that they take forever to complete and my patience usually runs out before I’ve finished decorating them! The dough freezes perfectly before it’s been rolled out and turned into cookies. If I had my way, we’d always have a batch or two in the freezer to save some time making these.


Lemon Sugar Cookies:

2 sticks of unsalted butter, at room temperature
1 cup of confectioners’ sugar
1 egg
2½ tsp. vanilla extract
2½ cups of all-purpose flour
½ tsp. salt
Zest of half a lemon (or orange if you prefer)

1. Cream together butter and sugar on medium-high speed until smooth.
2. Beat in the egg, vanilla and zest until combined.
3. Slowly add the flour and salt on low speed until incorporated.
4. Form into a ball, wrap in plastic wrap and refrigerate for 1 to 2 hours until firm.
5. Roll out the dough between two layers of plastic wrap to keep it from sticking, use cookie cutters to make desired shapes.
6. Once on a cookie sheet, refrigerate 5 minutes before putting them into a 375-degree oven for 8-10 minutes. Make sure you rotate the pan halfway through baking.
7. The cookies are ready when they are still white in color. If they are turning golden brown, they’ve been in the oven too long!
8. Let cool a few minutes on the cookie sheet and move them to a wire rack to cool completely until they are ready to be iced.


Royal Icing:

4 cups of confectioners’ sugar
2 tbsp. meringue powder
6 tbsp. water
Gel food coloring

1. Combine all the ingredients in a stand mixer (or mix by hand) on medium speed, until the icing has a smooth and matte consistency, about 10 minutes.
2. Separate Icing into separate bowls for dying. Use gel food coloring to not alter the texture.
3. Once all the colors are created, divide the colors into two batches, one thick batch for the contour lines, and one thinner watered down batch for the filling. Place the contour icings into bags and pipe the outline onto cookies. Fill the cookies with the runnier icing until smooth. Let them dry 1-2 hours, or overnight.
4. Pipe detail onto cookies and let set 1-2 hours.
5. They are ready to eat or wrap into cute little cellophane gift bags!


Bon Appétit and Happy Easter!