Showing posts with label Lunch. Show all posts

Wednesday, January 25, 2012

Roasted Butternut Squash Soup

Another one of my should-have-posted-a-month-ago-but-all-of-a-sudden-I-got-too- busy-and-forgot-about-it recipes. This one is Roasted Butternut Squash Soup! Probably the easiest of all soup recipes but because it has only 2-3 ingredients and tastes absolutely divine on a cold winter day.

Ingredients:

1 Butternut Squash, halved, seeds scooped out

Some olive oil

½ Onion, chopped

3 Cups of Vegetable broth

1 Tsp of Nutmeg

Salt and Pepper to taste

(Seriously, that’s all the ingredients)

1. To roast the squash, drizzle olive oil on the squash (on everything that isn’t the skin), place skin side up on parchment paper on a cookie sheet. Bake for 1 hour in a 350-degree oven. When pierced with a fork, the squash should already feel very soft.

2. Brown the onions in a large pot with some olive oil. Scoop the roasted squash out of the skin and into the pot.

3. Add the broth and spices. Bring to a boil, let simmer for 30 minutes.

4. Blend the soup in a blender, or use an immersion blender.

5. Serve immediately. I topped mine with some sour cream snowflakes but that’s only because it was the holidays! A dollop would probably work as well…

Bon Appétit!

Monday, May 9, 2011

Chicken Stroganoff

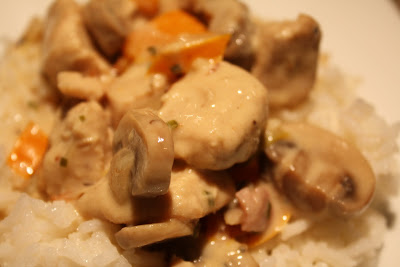
Sorry for the lack of updates recently, I have absolutely no inspiration lately and had to force myself to make something remotely decent as a Mother’s Day meal for my mom because the night before I made the super delicious but extremely basic and bland “pasta with butter, cheddar and ham”. This Chicken Stroganoff recipe, which I sort of based on a few recipes I found online, is the ultimate comfort food and I ate way too much of it. I also added peppers to it so I wouldn’t have to make a vegetable dish… They are the biggest drag.


Ingredients:
2 Tbsp. All-purpose flour
2 or 3 Medium Chicken Breasts, cut into 1-2” chunks
1 Tsp. Ground Sage
1 Tsp. Ground Thyme
Salt and Pepper
2 Tbsp. Olive Oil
1 Tbsp. Butter
½ A Golden Onion, chopped finely
2 Cloves of Garlic, pressed
3 Cups White Mushrooms, sliced
2 Yellow/Orange Peppers, chopped
1½ Cups of Chicken Stock
½ Cup Heavy Cream
½ Cup Sour Cream (the best!)


1. In a bowl, toss the chicken chunks with the flour, sage, thyme, salt and pepper.
2. In a deep skillet, heat the olive oil and cook the chicken until golden brown. Remove the chicken from the skillet and set aside.
3. In the same skillet, melt the butter. Add the onions, garlic and mushrooms, toss to coat. Sprinkling some salt onto the mushrooms will help them release their liquid. Saute the vegetables until they are lightly browned over low heat.
4. Deglaze the bottom of the skillet with some white wine, or some chicken broth, pour in the rest of the broth. Simmer for 5 minutes.
5. Return the chicken to the pan, add the heavy cream. (If you wanted to serve the dish with egg noodles, now would be the time to stir 3 cups of Egg noodles, with an extra cup of chicken broth!) Stir in chopped yellow/orange pepper. Simmer 10 minutes or until sauce is thickened.
6. Remove from heat, take a few tablespoons of the sauce to mix into the sour cream to prevent curdling. Once the sour cream has been mixed in with some hot sauce, stir the sour cream into the final dish.
7. You may serve this chicken stroganoff with anything. I served it with rice for my parents, but ate it with macaroni. I think the best way to eat it is with egg-noodles.


Bon Appétit!

Sunday, May 1, 2011

Bacon and Broccoli Mac'n'Cheese

Since it was my brother’s birthday, I asked him what he wanted me to make for him. His answer: MAC AND CHEESE! Immediately followed by my mom saying “add broccoli, he needs veggies!” Reluctantly, I added some broccoli to the dish but it wasn’t as bad as it sounds. I think the bacon had something to do with it! I just love love love this mac’n’cheese and if I could pick only one meal to eat over and over for the rest of my life, it would be this one (Minus the broccoli, of course!).


Ingredients:
4 Cups of Macaroni
2 Broccoli crowns cut into small bite sized pieces, steamed
5 Slices of thick Bacon, chopped
3 Tbsp. of Flour
2 Cups of Milk, at room temperature
1½ Tbsp. Dijon Mustard
1½ Cup of Grated Sharp Cheddar
½ Cup of Panko Breadcrumbs
¼ Cup of Parmesan
Salt and Pepper

1. Cook the macaroni 8 minutes, or until almost cooked, rinse in cold water to stop the cooking process and set aside.
2. Fry the bacon bits in a saucepan on medium high heat until nice and crispy. Remove the bacon bits, leaving as much of the bacon fat in the saucepan.
3. Add the flour to the fat and whisk until evenly pasty. Slowly add the milk while whisking. Let the sauce thicken a bit while adding the milk. (If you add the milk too quickly, the sauce will curdle in a weird non-creamy way)
4. Once the sauce is thick and all the milk has been added, add the mustard, and some salt and pepper. If the sauce is too thick, slowly add some more milk in until you’ve reached a consistency you’re happy with.
5. Add the grated cheese to the sauce. Stir while it melts.
6. Once the cheese sauce is melted, add the bacon bits and broccoli.
7. In a large bowl, mix together the macaroni and the sauce until it is evenly mixed. Pour into a casserole dish.
8. Mix the Panko and Parmesan together, and sprinkle evenly over the macaroni.
9. Cook in a 425-degree oven for 20 Minutes, or until crispy golden brown.
10. Let sit a few minutes before serving.


Bon Appetit!

Tuesday, April 26, 2011

Creamy Bacon, Mushroom and Green Pea Linguini

This recipe is long overdue but I was too lazy to upload the pictures to my computer. I made this for lunch over a week ago, using up leftover Ricotta from the Spanakopita I posted last week. I also had to use mushrooms because they were starting to go brown. Not that any of you needed to know that… So this is what I came up with! Enjoy.


Ingredients:
6 thick slices of Bacon, chopped
1 ½ cup Frozen Green Peas
1 ½ cup Sliced White Mushrooms
½ cup Red Onion, chopped
¼ cup Cream Cheese
½ cup Ricotta Cheese (Had there been Crème Fraiche in the fridge, I would’ve used that, but
¼ cup Parmesan Cheese
Salt and Pepper
Linguine, though I am a big fan of Farfalle (‘Bow-ties’)

1. While preparing this dish, put some water to boil and cook some pasta in a large pot. (I’m assuming that if you are reading this, you know how to cook any kind of pasta)
2. In a Wok (Incase you haven’t noticed yet, I like using woks because I don’t spill as much when I’m stirring. It’s ridiculous how much of a mess I can make), fry the bacon bits until nice and crispy.
3. Remove the bacon bits from their own fat and set them on a paper towel. In the bacon fat, fry the onions until soft and translucent. Add the mushrooms and peas and stir until both are soft.
4. Add the cheeses to the peas and mushrooms. Once they are melted, stir the bacon back into the dish. (I take the bacon out of the process early so the bacon doesn’t absorb flavors, while cooking all the ingredients in the bacon fat, because: hello! Bacon is too delicious to be overpowered!)
5. Stir the sauce into the pasta (which should be cooked by now), and serve.


Bon Appétit!

Napa Cabbage Salad

I stole this recipe from my mom’s own recipe book but the truth is, she only has it in her own book because we had it 9 years ago at a Potluck. I loved it so much she asked her friend for the recipe and has maybe made it once since… Unfortunately for me, it’s a very deceiving salad. It feels… somewhat healthy… but it’s heavy on the butter and oil, thus delicious and extremely bad for any diet because you can’t just have a bit. You should try it out! It makes a big bowl full so it’s great for large gatherings or gluttons like my family and I. Ha! I’m just kidding… We really do love food though! A LOT! (and there are no leftovers...)


Ingredients:
1 Large head of Napa Cabbage
5 Green onions, finely chopped
1 cup of Chinese Style noodles
½ cup of Sesame Seeds
½ cup of Slivered Almonds
½ cup of butter (1 stick)

For the Dressing:
¾ cup of Oil
2 Tbsp Soya Sauce
2 Tbsp Sugar
½ cup Rice Vinegar

1. Chop cabbage and remove the coarse part of the core. Mix the green onions with the cabbage in a large bowl and refrigerate while preparing the rest of the salad.
2. Break the noodles. In a large frying pan, brown the noodles, almonds and sesame seeds in butter. Refrigerate until needed.
3. In a covered jar, combine all the dressing ingredients and shake well.
4. Half an hour before serving the salad, mix the noodle mixture and the dressing into the cabbage and toss.


Bon Appétit!

Wednesday, April 20, 2011

Spanakopita with Greek Salad

There was a mix-up with dinner tonight: I knew we were supposed to eat Greek salad but I didn’t really know what to serve it with so I made Spanakopita instead of Chicken skewers which I was supposed to make. The problem is we never have what I really need in the fridge to make anything the proper way so I had to get slightly creative…. With only enough Feta for the Greek salad, I had to use Ricotta and Parmesan to keep things cheesy. I’m proud of the way they turned out though because I did have my doubts about the lack of flavour in Ricotta…. Salt is a definitive must!


Spanakopita
(Serves 6, or 4 gluttons)

1 roll of Frozen Phyllo Pastry
1 box of Frozen Chopped Spinach
½ Golden Onion, chopped
2-3 Garlic Cloves, Minced
2 Eggs, beaten
½ cup Ricotta
¼ cup Feta
¼ cup Parmesan
1 tbsp. Parsley, chopped
Salt and Pepper to taste
½ cup butter, melted

1. Set the phyllo pastry and the frozen spinach out to thaw a few hours before starting to cook (never microwave the phyllo pastry! I did microwave the spinach though).
2. In a bowl, mix the cheeses, parsley, salt and pepper until well blended. Set aside.
3. In a wok or frying pan, sauté onions and garlic in 1-2 tbsp. of oil until translucent. Add the spinach and stir frequently as it heats up. Cook on high heat until most of the liquid in the pan has evaporated. Let cool a bit and pour into the cheese mixture.
4. On a clean surface, layer one phyllo sheet. With a paintbrush, coat the entire sheet with some melted butter. Layer a 2nd sheet on top and smooth it out with your hands to prevent air bubbles. Repeat with a 3rd sheet.
5. With a pizza cutter, slice the buttered phyllo sheets lengthwise into 2 (or 3) equal parts.
6. Place a generous handful of the spinach mixture on one end of the phyllo length. To fold, pull one of the corners into the opposite side, to form a triangle. Fold that triangle over following the whole length. When you get to the end, fold the small leftover section of phyllo (not long enough for a last fold) under the triangle, place on a cookie sheet, and coat evenly with butter.
7. Repeat the folding step until there is no more spinach left.
8. Bake in a 375-degree oven for 20-25 minutes until evenly golden brown. Serve warm with some Greek salad


* Note: I used 3 sheets per triangle for thickness, but 2 also works if the triangles are smaller.

Bon Appétit, or as the Greeks would say “Kalí óreksi”!

Tuesday, April 19, 2011

Julia Child Inspired Bruschetta

This recipe is a recipe I crave often but never actually get around to making because it entails toasting bread in a pan full of olive oil and my guilt often overpowers my cravings. From the moment I saw it being made on "Julie & Julia," I knew I had to try it for myself. It's very simple, quick, and is full of summer flavours that I can never get enough of... so without further a do:


Julia Child Inspired Bruschetta:
(Serves 4)

1 fresh French Baguette, sliced into 1cm diagonal slices
1 ½ cups of chopped tomatoes (romas are best but I used on-the-vine today because it’s all we had!)
2 tbsp. of chopped fresh basil
1 ½ tbsp. of olive oil + more for the pan
2-3 cloves of garlic, minced
salt and pepper to taste

1. Mix the chopped tomatoes, chopped basil, minced garlic, salt and pepper, and the oil into a bowl. Set aside.

2. Pour a generous amount of olive oil in a pan and heat over medium heat until hot. Place slices of baguette in the hot oil, 1-2 minutes per side until crispy golden/brown. Do not overcrowd the pan, and add more oil if the first few slices absorb too much.

3. Once all the slices are crispy, top with the tomato mixture and serve immediately. They can be served with parmesan, or garnished with a basil leaf.


Bon Appétit!

Sunday, April 17, 2011

Meaty Monday

I’m all about keeping it simple when I’m too tired or lacking creativity so I ended up making spaghetti and meatballs for dinner tonight. I’ve never actually made meatballs before as I’m not much of a “ground beef” kind of girl but I’m trying to be open minded and I’m not going to lie…. These meatballs are really good! They almost rival the Swedish Meatballs at IKEA, as far as meatballs go!


Spaghetti & Meatballs
(Serves 6-8)

For the meatballs:
1½ lbs. Lean ground Beef
1½ cups Panko, or regular bread crumbs
¼ cup of Grated Parmesan
½ tsp. Garlic powder
1 tbsp. Fresh chopped parsley
½ tsp. Salt
½ tsp. Pepper
1 egg, beaten

For the tomato sauce: (I definitely got lazy/didn’t have the ingredients necessary to make a sauce from scratch)
1 large can of tomato sauce (I used a “garlicky tomato” sauce)
2 tbsp. olive oil
1 medium onion, finely chopped
1 tbsp. garlic cloves, minced

1. Put all the meatball ingredients in a bowl and mix them well until well blended, using your hands works best. Make about 20 1” meatballs with your hands, place them on plate or cookie sheet and set aside.

2. In a saucepan, sauté the onions and garlic in the olive oil until translucent. Empty the entire can of tomato sauce. Bring to boil, stirring occasionally. Let sauce simmer for 10-15 minutes and add the uncooked meatballs individually, until they are all coated evenly. Cover, simmer or medium heat for 35 minutes.

3. Cook spaghetti while meatballs are cooking in the sauce. Serve pasta in bowls, and place meatballs on top. Garnish with a bit of fresh parsley and some grated cheese.


Bon Appétit!