Showing posts with label Icing. Show all posts

Thursday, August 9, 2012

Monkey Bread Muffins!


 I feel a little bit guilty about not having posted any recipes in so long but the truth is, my schedule has been just a little bit too hectic. This recipe was supposed to go up a few months ago but I didn't get around to writing this post until today. I have a few more like this one that I do really want to share so I'll have to make an effort to get those posts written asap! For now, enjoy these little monkey bread muffins - a delicious and super easy alternative to cinnamon rolls! You don't need to spend anytime waiting for the dough to rise to it's a very quick cinnamon craving fix! 


Ingredients:
1½ sticks of butter, cut into small pieces
2 Tbsp of maple syrup
1/3 Cup of sugar (+ 2Tbsp for the dough)
1/3 Cup of brown sugar
1 Tbsp of cinnamon
2 Cup of Flour
1 Tbsp of baking powder
½ Tsp of salt
¾ cup of buttermilk (though we never have butter milk at home – I always just measure out the ¾ milk and squirt 1 Tbsp of lemon juice into it and let it sit for 15-20 minutes before using)
For the drizzle:
1 Cup of icing sugar
2 Tbsp of Milk

For the dough:
In a food processor, pulse the flour, baking powder, 2 Tbsp of sugar and the salt until combined. Use all but 4Tbsp of the butter and pulse the small chunks with the flour mixture until the entire mixture looks crumbly. Add the buttermilk and pulse until the dough forms.
Work the dough with floured hands and separate it into 20-30 little dough balls.
Combine the sugars and cinnamon into a small bowl.
Melt 4 Tbsp of butter with the 2 Tbsp of maple syrup in a microwave safe bowl (maybe 30 seconds not more) and set aside. Use muffin liners to keep the muffins from falling apart
Prepare the muffin pans before the assembly process as it can get quite messy. This recipe makes 12 muffins.
Dip each small dough ball into the butter/maple syrup mixture until they are fully coated, and coat in the cinnamon/sugar mixture. Once they are coated, place them in a muffin pan (3/4 per muffin).
Bake on the bottom rack of a 425-degree oven for 15 minutes (or until they are nice and golden). Once out of the oven, drizzle with the glaze ( combine the icing sugar and milk until smooth) and enjoy!


Bon Appétit! 

Thursday, January 26, 2012

Girls Night Out Cookies

Cosmopolitans and lingerie... What more could a girl ask for?


Recipe can be found here.

Bon Appetit!

Butterfly Sugar Cookies


I made these butterfly sugar cookies for Claire and Gabi and hand delivered them during my trip to Calgary earlier this month. So far, I think they are the most complex cookies I've made, but if you have enough patience, and you don't mind staining your fingertips black (oh, the joys of food colouring), these cookies are surprisingly easy to make! First of all, the recipes for these cookies can be found here. Like I've probably mentioned in the past, this dough freezes very well so you can always make a double batch, use only the dough you need (I only made 12 cookies) and freeze the rest in plastic wrap.

The tie-dye effect on the black/blue and tricolour butterflies was very simple to achieve. You need to prepare all your icing colours, making them all virtually the same consistency (liquid, but not too liquid that it can't hold its own shape. Pipe in the outlines and work your way in. I piped the black edges as well as the body in black, then I piped in the blue, and lastly piped in the yellow. Once all the colours were on and there were no gaps, I used a toothpick (a butter knife edge would work as well) and dragged the black icing inwards. At first it didn't look like much, but as the icing sets, the colours sink in to create the cool effect.


I think the only really important part about making these, or any sugar cookies for that matter, is really just being patient and not forcing any of the icing to set or hold its shape until it is very dry. If you get tired, just leave the cookies out for a few hours and come back to them when you're ready. Enjoy!

Bonne Chance!

Monday, January 16, 2012

Chocolate Sugar Cookie Santa Mittens

I’m finally getting back on track with posting recipes after a busy holiday season. I probably should have posted these ones WAY before Christmas but I completely lost track of time. As always, I make up reasons to bake my days away and made these specifically for my brother’s grade 4 class as a treat to bring in for their Christmas party. The recipe is very simple, as is the design. The hardest part about any of these sugar cookies is really the amount of patience you have to let them dry properly between steps. It’s really come to my attention recently that patience is probably the only skill in life you need to get anywhere, or create absolutely anything. This is good practice. Enjoy!

Chocolate Sugar Cookies:

Ingredients:

¾ cup of all-purpose flour

1/3 cup of cocoa powder

6 Tbsp of butter, unsalted and at room temperature

¾ cup of confectioners’ sugar

1 egg

½ tsp vanilla extract

Pinch of salt

In a bowl, combine the flour, salt, cocoa powder. In a larger bowl, or the stand mixer (my one true love!) beat the sugar and butter together until light and fluffy (a few minutes). Stir in the egg and vanilla on low speed until combined. Slowly add in the flour mixture until dough forms. Wrap it in plastic in the disk shapes, and refrigerate for 1-2 hours. Once the dough has chilled, roll it out on a floured surface OR between two layers of plastic wrap (this method is ingenious and practically mess proof!) Cut into desired shapes only once the dough has been rolled out to ¼” in thickness. Bake in a 325-degree oven for 10 minutes. Let cool on the rack for 10 minutes before transferring them to a wire rack.


For the Icing:

4 cups of confectioners’ sugar
2 tbsp. meringue powder (this stuff is expensive, and I use it way too often!)
6 tbsp. water
Gel food coloring

1. Combine all the ingredients in a stand mixer (or mix by hand) on medium speed, until the icing has a smooth and matte consistency, about 10 minutes.
2. Separate Icing into separate bowls for dying. Use gel food coloring to not alter the texture.
3. Once all the colors are created, divide the colors into two batches, one thick batch for the contour lines, and one thinner watered down batch for the filling. Place the contour icings into bags and pipe the outline onto cookies. Fill the cookies with the runnier icing until smooth. Let them dry 1-2 hours, or overnight.
4. Pipe detail onto cookies and let set 1-2 hours.
5. They are ready to eat or wrap into cute little cellophane gift bags!


Bon Appetit!

Saturday, December 17, 2011

Two-Bite Brownie Santa Hats

I really love holiday baking. I can go crazy in the kitchen and no matter how much I bake, I won’t be tempted to eat any of it because I give so much of it away to friends, family, school teachers etc. This particular recipe was as an idea I saw online. There are a lot of recipes for these brownies but I thought it would be so much easier to just buy two-bite brownies and make cream cheese frosting (the easiest and also the best) although... Betty Crocker Icing would have made this even easier. The entire assembly process took around 10 minutes and I heard from my dad, that these were a huge hit at his office! Furthermore, I’m pretty sure they are the cutest thing to ever come out of my kitchen.

Ingredients:

1 Lbs Strawberry

1 Bag of Two-Bite Brownies

For the Frosting:

8 Oz of Cream Cheese

5 Tbsp of Butter

3 Cups of Icing Sugar

A Splash of lemon juice

Cream the butter and the cream cheese until light with a hand mixer, slowly add icing sugar while slowly mixing. Add the lemon juice squeeze. Place the frosting into a Ziploc freezer bag or actual piping bag with a round tip. Place icing on each brownies. Wash and pat dry all the strawberries. Cut the stems off. Place one strawberry on each brownie. Top each strawberry with a dollop of icing and serve shortly after. Don’t make the mistake I made by placing these in the fridge over night… The strawberries will sweat, and you'll have to wipe them down and start over!

Bon Appétit!

Monday, December 5, 2011

My 2011 Gingerbread House

Here are a few pictures of the Gingerbread House I made this year. Everything but the snowmen's scarves and arms is edible! I got the pre-cut gingerbread cookie house at IKEA, and the royal icing recipe I used to build and decorate can be found here. Enjoy!


Tuesday, November 29, 2011

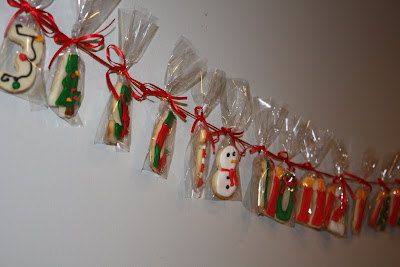
Sugar Cookies - Christmas Advent Calendar Edition


I've been keeping busy this past week... I got this crazy Idea a few weeks ago to make advent calendars out of sugar cookies. We have numbered cookie cutters so I thought it would be very simple and easy. Boy, was I wrong! After calculating that I would have to make 5 different colours of icing (probably more, I've lost track) as well as dirty all the cookie cutters. I deciding only making myself an advent calendar wasn't worth it so I attempted to make 12!

For those of you who can't do the math... That's 41 cookies. Per calendar. times 12. FOUR HUNDRED AND NINETY TWO COOKIES.


and eventually, with a little help from my sister just when I was about to lose it completely... we managed to finish


A few met untimely deaths when a pack of chocolates fell on them... and in the end.. I was left with 10 whole advent calendars, and two almost whole calendars that my brother will surely devour.


My favorites were by far the little snowmen "8"!


Here is the first completed calendar, also our first christmas decoration of the year!


Monday, April 25, 2011

Sugar Cookies - Easter Edition

Every holiday, I find myself making sugar cookies to spread some holiday cheer. They are great hostess gifts and are also very cute! The recipe is always the same but the results are endless. The only downside to making these is that they take forever to complete and my patience usually runs out before I’ve finished decorating them! The dough freezes perfectly before it’s been rolled out and turned into cookies. If I had my way, we’d always have a batch or two in the freezer to save some time making these.


Lemon Sugar Cookies:

2 sticks of unsalted butter, at room temperature
1 cup of confectioners’ sugar
1 egg
2½ tsp. vanilla extract
2½ cups of all-purpose flour
½ tsp. salt
Zest of half a lemon (or orange if you prefer)

1. Cream together butter and sugar on medium-high speed until smooth.
2. Beat in the egg, vanilla and zest until combined.
3. Slowly add the flour and salt on low speed until incorporated.
4. Form into a ball, wrap in plastic wrap and refrigerate for 1 to 2 hours until firm.
5. Roll out the dough between two layers of plastic wrap to keep it from sticking, use cookie cutters to make desired shapes.
6. Once on a cookie sheet, refrigerate 5 minutes before putting them into a 375-degree oven for 8-10 minutes. Make sure you rotate the pan halfway through baking.
7. The cookies are ready when they are still white in color. If they are turning golden brown, they’ve been in the oven too long!
8. Let cool a few minutes on the cookie sheet and move them to a wire rack to cool completely until they are ready to be iced.


Royal Icing:

4 cups of confectioners’ sugar
2 tbsp. meringue powder
6 tbsp. water
Gel food coloring

1. Combine all the ingredients in a stand mixer (or mix by hand) on medium speed, until the icing has a smooth and matte consistency, about 10 minutes.
2. Separate Icing into separate bowls for dying. Use gel food coloring to not alter the texture.
3. Once all the colors are created, divide the colors into two batches, one thick batch for the contour lines, and one thinner watered down batch for the filling. Place the contour icings into bags and pipe the outline onto cookies. Fill the cookies with the runnier icing until smooth. Let them dry 1-2 hours, or overnight.
4. Pipe detail onto cookies and let set 1-2 hours.
5. They are ready to eat or wrap into cute little cellophane gift bags!


Bon Appétit and Happy Easter!