Showing posts with label Cookies. Show all posts

Thursday, April 19, 2012

Guilt-Free Oatmeal Raisin Cookies

I tried to impress a boy with my baking, bragged about how good I could make any cookie and told him I would make his favourite – oatmeal raisin for our picnic the following day. I started baking these at 11pm (after work) and realized I had NONE of the required ingredients to make these exactly how I wanted to make them (no flour, not enough butter, not enough sugar etc.). I had to substitute practically all the ingredients, and was so worried these wouldn’t turn out… Thankfully they did (like I said… all cookies are delicious) but what’s even crazier is just how healthy they really were! Here is a revised, completely new healthy, whole wheat, low-fat cookie.


Ingredients:

½ Cup of Butter

½ Cup of Applesauce

1 Cup of Brown Sugar

1 Cup of White Sugar

2 eggs

1 Tsp Vanilla Extract

1 ¾ Cups of Whole Wheat Flour

1 Tsp of baking soda

½ Tsp of salt

1 ½ Tsp of cinnamon

¼ Tsp of Nutmeg

3 Cups of Rolled Oats

1 Cup of raisins

1. In a large bowl, beat the butter, applesauce, sugars, eggs and vanilla, until well blended.

2. Soak the raisins in a bowl of boiling water for 10 minutes to create juicier raisins to bite into once the cookies are baked.

3. In a separate bowl, combine the flour, baking soda, salt, cinnamon, and nutmeg.

4. Poor the dry ingredients into the wet ingredients.

5. Add the drained raisins.

6. Place cookies 2” apart on a cookie sheet and bake for 8-10 minutes in a 375-degree oven.

Bon Appétit!

Saturday, April 14, 2012

2011-2012 Canucks Roster!

First, a warning: This post is extremely photo-heavy.
Second: The cookie recipe can be found here
Third: These cookies were made in January, before any trades happened.
Lastly: I figured posting these before the Canucks head off to L.A. might somehow help them win the next 4 games!

Enjoy:


GOOD LUCK IN L.A. BOYS!


Monday, February 20, 2012

Cranberry White Chocolate Chip Cookies

After reading a very interesting article on the science of a chocolate chip cookie, I was compelled to try my own. No recipe, just good ingredients. I’m already over satisfied with the chocolate chip cookie recipe I already use so I changed it up a little with the craisins and white chocolate. If you don’t have much of a sweet tooth, these cookies probably aren’t for you. However, if you do like sweets… You have GOT to try these!

Ingredients

2 ¼ Cups of All-purpose Flour

1 Tsp Baking Soda

1 Tsp Salt

1 Cup of Butter (2 sticks), room temperature

1/2 Cup of White Sugar

1 Cup of Brown Sugar

1 Tsp of Brandy (or more)

1 Egg

3 Tbsp of Milk

1 Cup of White Chocolate Chips

1 Cup of dried Cranberries

(The boy likes them. Success!)

1. In a large bowl, mix butter and sugars until light and fluffy.

2. Add in the egg, brandy and milk. Mix until well combined.

3. Mix flour, baking soda and salt. Slowly stir into the wet ingredients until combined.

4. Add in the chocolate and cranberries.

5. Place on a baking sheet in a 325-degree oven for 8-10 minutes, until the cookies are golden and the kitchen smells divine.

Bon Appétit!


P.S. Gifting baked goods is also the secret to not gaining 20lbs a week

Thursday, January 26, 2012

Girls Night Out Cookies

Cosmopolitans and lingerie... What more could a girl ask for?


Recipe can be found here.

Bon Appetit!

Butterfly Sugar Cookies


I made these butterfly sugar cookies for Claire and Gabi and hand delivered them during my trip to Calgary earlier this month. So far, I think they are the most complex cookies I've made, but if you have enough patience, and you don't mind staining your fingertips black (oh, the joys of food colouring), these cookies are surprisingly easy to make! First of all, the recipes for these cookies can be found here. Like I've probably mentioned in the past, this dough freezes very well so you can always make a double batch, use only the dough you need (I only made 12 cookies) and freeze the rest in plastic wrap.

The tie-dye effect on the black/blue and tricolour butterflies was very simple to achieve. You need to prepare all your icing colours, making them all virtually the same consistency (liquid, but not too liquid that it can't hold its own shape. Pipe in the outlines and work your way in. I piped the black edges as well as the body in black, then I piped in the blue, and lastly piped in the yellow. Once all the colours were on and there were no gaps, I used a toothpick (a butter knife edge would work as well) and dragged the black icing inwards. At first it didn't look like much, but as the icing sets, the colours sink in to create the cool effect.


I think the only really important part about making these, or any sugar cookies for that matter, is really just being patient and not forcing any of the icing to set or hold its shape until it is very dry. If you get tired, just leave the cookies out for a few hours and come back to them when you're ready. Enjoy!

Bonne Chance!

Monday, January 16, 2012

Candy Cane Macarons

This is my 4th attempt at making macarons, but the 1st of what I would call “successful”. I’ve tried different cookbook recipes, different flavours, but this is the first one I am more than thrilled to share with you. I won’t bother writing the recipe down as I’m pretty sure that’s what we call “plagiarism.” I’m only sharing my pictures and sending you on your way to the only recipe I trust! Annie’s Eats is, hands down, my favourite food blog. I read it almost daily and want to try pretty much every recipe she posts, not to mention her food photography is to die for!

Please make these for yourself, and definitely consider trying the various flavours she’s posted on. Enjoy!

Candy Cane Macarons can be found on this webpage of Annie’s Eats.

My only advice for these finicky cookies would be that you not make them on a rainy day. Your environment needs to be dry, and you need to be patient and not overwork ANYTHING. Good Luck!

Bon Appetit!

Chocolate Sugar Cookie Santa Mittens

I’m finally getting back on track with posting recipes after a busy holiday season. I probably should have posted these ones WAY before Christmas but I completely lost track of time. As always, I make up reasons to bake my days away and made these specifically for my brother’s grade 4 class as a treat to bring in for their Christmas party. The recipe is very simple, as is the design. The hardest part about any of these sugar cookies is really the amount of patience you have to let them dry properly between steps. It’s really come to my attention recently that patience is probably the only skill in life you need to get anywhere, or create absolutely anything. This is good practice. Enjoy!

Chocolate Sugar Cookies:

Ingredients:

¾ cup of all-purpose flour

1/3 cup of cocoa powder

6 Tbsp of butter, unsalted and at room temperature

¾ cup of confectioners’ sugar

1 egg

½ tsp vanilla extract

Pinch of salt

In a bowl, combine the flour, salt, cocoa powder. In a larger bowl, or the stand mixer (my one true love!) beat the sugar and butter together until light and fluffy (a few minutes). Stir in the egg and vanilla on low speed until combined. Slowly add in the flour mixture until dough forms. Wrap it in plastic in the disk shapes, and refrigerate for 1-2 hours. Once the dough has chilled, roll it out on a floured surface OR between two layers of plastic wrap (this method is ingenious and practically mess proof!) Cut into desired shapes only once the dough has been rolled out to ¼” in thickness. Bake in a 325-degree oven for 10 minutes. Let cool on the rack for 10 minutes before transferring them to a wire rack.


For the Icing:

4 cups of confectioners’ sugar
2 tbsp. meringue powder (this stuff is expensive, and I use it way too often!)
6 tbsp. water
Gel food coloring

1. Combine all the ingredients in a stand mixer (or mix by hand) on medium speed, until the icing has a smooth and matte consistency, about 10 minutes.
2. Separate Icing into separate bowls for dying. Use gel food coloring to not alter the texture.
3. Once all the colors are created, divide the colors into two batches, one thick batch for the contour lines, and one thinner watered down batch for the filling. Place the contour icings into bags and pipe the outline onto cookies. Fill the cookies with the runnier icing until smooth. Let them dry 1-2 hours, or overnight.
4. Pipe detail onto cookies and let set 1-2 hours.
5. They are ready to eat or wrap into cute little cellophane gift bags!


Bon Appetit!

Monday, December 5, 2011

My 2011 Gingerbread House

Here are a few pictures of the Gingerbread House I made this year. Everything but the snowmen's scarves and arms is edible! I got the pre-cut gingerbread cookie house at IKEA, and the royal icing recipe I used to build and decorate can be found here. Enjoy!


Tuesday, November 29, 2011

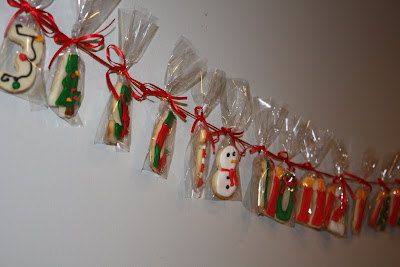
Sugar Cookies - Christmas Advent Calendar Edition


I've been keeping busy this past week... I got this crazy Idea a few weeks ago to make advent calendars out of sugar cookies. We have numbered cookie cutters so I thought it would be very simple and easy. Boy, was I wrong! After calculating that I would have to make 5 different colours of icing (probably more, I've lost track) as well as dirty all the cookie cutters. I deciding only making myself an advent calendar wasn't worth it so I attempted to make 12!

For those of you who can't do the math... That's 41 cookies. Per calendar. times 12. FOUR HUNDRED AND NINETY TWO COOKIES.


and eventually, with a little help from my sister just when I was about to lose it completely... we managed to finish


A few met untimely deaths when a pack of chocolates fell on them... and in the end.. I was left with 10 whole advent calendars, and two almost whole calendars that my brother will surely devour.


My favorites were by far the little snowmen "8"!


Here is the first completed calendar, also our first christmas decoration of the year!